FRONT SEAT ASSEMBLY (for Separate Folding Seat Type) > REASSEMBLY |

for Preparation Click here
- CAUTION:
- Wear protective gloves. Sharp areas on the parts may injure your hands.
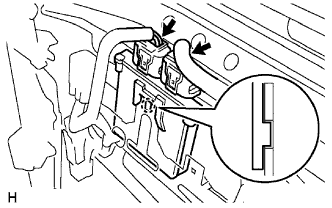
| 1. INSTALL SEAT WIRE |
Install the 3 wire harness clamps and connector clamp.
 |
Connect the 4 connectors.
| 2. INSTALL OCCUPANT CLASSIFICATION ECU |
Engage the claw and install the occupant classification ECU.
 |
Connect the 2 connectors.
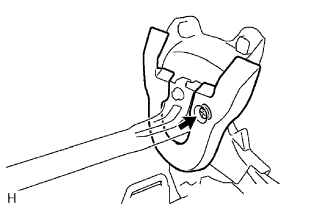
| 3. INSTALL RECLINING ADJUSTER OUTSIDE COVER LH |
Install the reclining adjuster outside cover with the screw.
 |
| 4. INSTALL RECLINING ADJUSTER OUTSIDE COVER RH |
- HINT:
- Follow the same procedures as for the reclining adjuster outside cover LH.
| 5. INSTALL RECLINING ADJUSTER INSIDE COVER LH |
Install the reclining adjuster inside cover with the screw.
 |
| 6. INSTALL RECLINING ADJUSTER INSIDE COVER RH |
- HINT:
- Follow the same procedures as for the reclining adjuster inside cover LH.
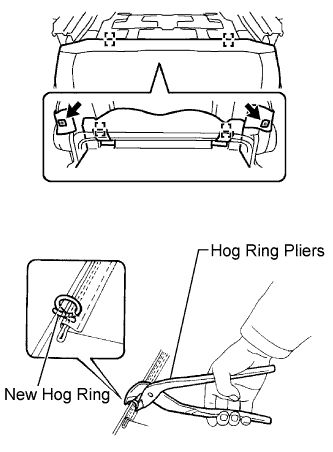
| 7. INSTALL FRONT SEAT CUSHION COVER |
Using hog ring pliers, install the front seat cushion cover with new hog rings.
- NOTICE:
- Do not soil or scratch the front seat cushion cover.
- When installing the hog rings, minimize wrinkles as far as possible.
 |
| 8. INSTALL FRONT SEAT CUSHION ASSEMBLY |
Engage the 2 claws and 3 hooks, and install the front seat cushion.
 |
Hook the front seat cushion cover to the front seat with adjuster frame.
 |
Using hog ring pliers, install new hog rings.
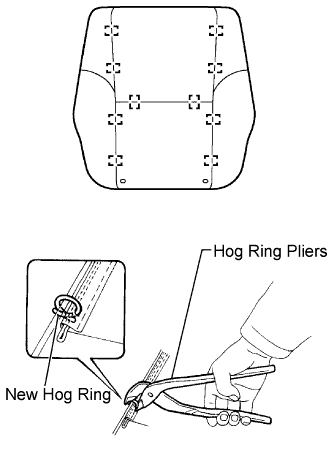
| 9. INSTALL FRONT SEAT BACK COVER |
Using hog ring pliers, install the front seat back cover with new hog rings.
- NOTICE:
- Do not soil or scratch the front seat back cover.
- When installing hog rings, minimize wrinkles as far as possible.
 |
| 10. INSTALL LOWER ACTIVE HEADREST UNIT |
Install the lower active headrest unit with the 2 nuts.
- Torque:
- 5.0 N*m{ 51 kgf*cm , 44 in.*lbf }
 |
| 11. INSTALL UPPER ACTIVE HEADREST UNIT |
Connect the lower active headrest unit cable.
 |
Install the upper active headrest with the 5 nuts.
- Torque:
- Nut A:
- 5.0 N*m{ 51 kgf*cm , 44 in.*lbf }
- Torque:
- Nut B:
- 14 N*m{ 142 kgf*cm , 10 ft.*lbf }
| 12. INSTALL FRONT SEAT BACK SPRING ASSEMBLY |
Install the front seat back spring into the front seat back pad.
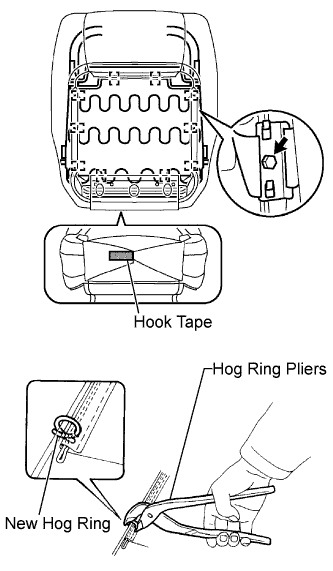 |
Install the hook tape.
Using hog ring pliers, install new hog rings.
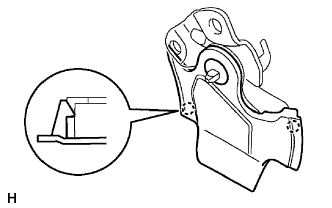
Fully cover the air bag with the inner hook and tighten the bolt.
- Torque:
- 5.5 N*m{ 55 kgf*cm , 49 in.*lbf }
- CAUTION:
- For vehicles with side air bag, the front seat back cover must be securely installed. Otherwise, the side air bag may not deploy properly.
- Make sure that the strap is not twisted after installing the inner hook.
- Install the inner hook securely.
| 13. INSTALL FRONT SEAT HEADREST SUPPORT |
 |
Engage the 2 claws and install the front seat headrest support.
- HINT:
- Follow the same procedures as for the opposite side.
| 14. INSTALL FRONT SEAT BACK LOCK HANDLE ROD |
Install the front seat back lock handle rod.
 |
| 15. INSTALL FRONT SEAT HINGE COVER LH |
Engage the 2 claws and install the front seat hinge cover.
 |
| 16. INSTALL FRONT SEAT HINGE COVER RH |
- HINT:
- Follow the same procedures as for the seat hinge cover LH.
| 17. INSTALL FRONT SEAT BACK LOCK SUB-ASSEMBLY LH |
Install the front seat back lock with the 2 bolts.
- Torque:
- 43 N*m{ 440 kgf*cm , 32 ft.*lbf }
 |
| 18. INSTALL FRONT SEAT BACK LOCK SUB-ASSEMBLY RH |
- HINT:
- Follow the same procedures as for the front seat back lock LH.
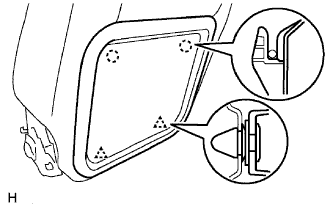
| 19. INSTALL FRONT SEAT BACK BOARD |
Engage the 2 claws and 2 clips, and install the front seat back board.
 |
| 20. INSTALL FRONT SEAT BACK ASSEMBLY |
Install the front seat back with the 4 bolts.
- Torque:
- 43 N*m{ 440 kgf*cm , 32 ft.*lbf }
 |
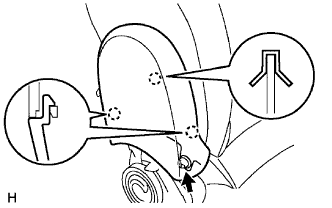
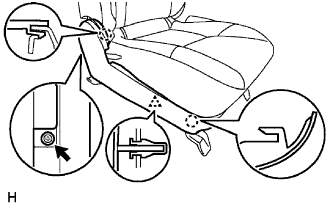
| 21. INSTALL FRONT SEAT BACK SHIELD LH |
Engage the 3 claws and install the front seat back shield.
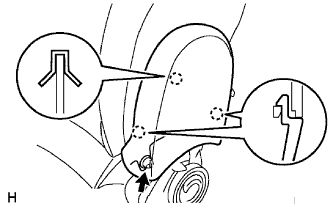 |
Tighten the screw.
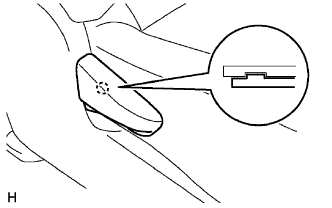
| 22. INSTALL FRONT SEAT BACK SHIELD RH |
The front seat side air bag wire must pass between the protector plate and the front seat back shield.
- HINT:
- Tune "W" to be able to thread the front seat side airbag wire and clips through.
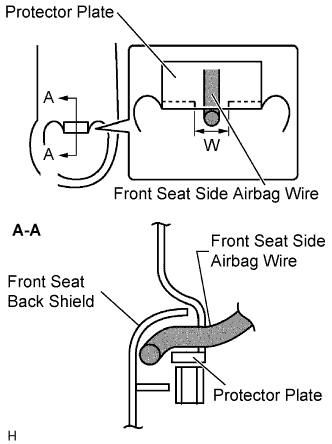 |
Engage the 4 claws and install the front seat side air bag wire.
 |
Engage the 3 claws and install the front seat back shield.
 |
Tighten the screw.
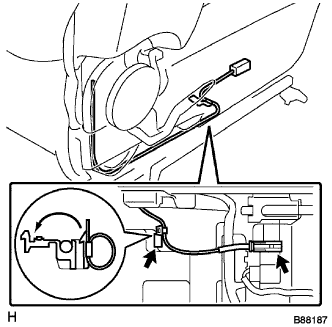
Install the wire harness clamp and connector clamp.
 |
| 23. INSTALL RECLINING ADJUSTER RELEASE KNOB LH |
Engage the claw and install the reclining adjuster release handle.
 |
| 24. INSTALL RECLINING ADJUSTER RELEASE KNOB RH |
- HINT:
- Follow the same procedures as for the reclining adjuster release handle LH.
| 25. INSTALL FRONT SEAT CUSHION SHIELD |
Engage the 2 claws and clip, and install the front seat cushion shield.
 |
Tighten the screw.
| 26. INSTALL RECLINING ADJUSTER RELEASE HANDLE |
Engage the claw and install the reclining adjuster release handle.
 |
| 27. INSTALL FRONT SEAT CUSHION INNER SHIELD |
Engage the claw and clip, and install the front seat cushion inner shield.
 |
Tighten the screw.
| 28. INSTALL FRONT SEAT INNER BELT ASSEMBLY |
Install the front seat inner belt with the nut.
- Torque:
- 42 N*m{ 428 kgf*cm , 31 ft.*lbf }
- NOTICE:
- Be careful not to place the front seat inner belt over the convex areas of the front seat with adjuster frame.
 |
Check that the front seat inner belt rotates smoothly.
Install the wire harness clamp and connector clamp.
Connect the seat wire No. 1 connector.
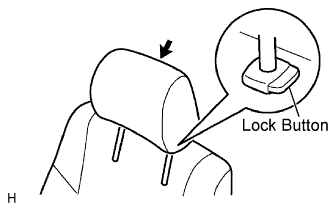
| 29. INSTALL FRONT SEAT HEADREST ASSEMBLY |
Disengage the lock button of the front seat headrest support and install the front seat headrest.
 |