FUEL PUMP > INSTALLATION |

for Preparation Click here
| 1. INSTALL FUEL SUCTION WITH PUMP & GAGE TUBE ASSEMBLY |
Install a new gasket onto the fuel tank.
Set the fuel pump assembly in the fuel tank.
- NOTICE:
- Be careful not to bend the arm of the sender gauge.
Fit a spline of the fuel suction tube assembly into a keyway of the fuel tank.
 |
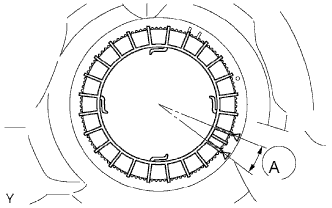
Install a new retainer.
Align the mark on a new retainer with the rib on the fuel tank as shown in the illustration.
Using SST, turn the retainer 740° to 780° clockwise (more than 2 turns), and position the mark on the retainer within range A to install it.
- SST
- 09808-14020
(09808-01410, 09808-01420, 09808-01430)
- HINT:
- The ribs on the retainer can be fitted into the tip of the SST.
 |
| 2. INSTALL FUEL TANK MAIN TUBE AND FUEL TANK RETURN TUBE |
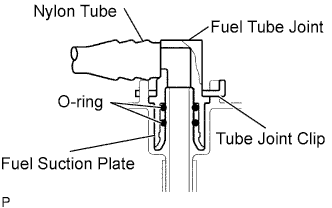 |
Install the fuel tank main tube and return tube with the 2 joint clips.
- NOTICE:
- Check that there are no scratches or foreign objects around the connected part of the fuel tube joint and plug before performing this work.
- Check that the fuel tube joint is securely inserted to the end.
- Check that the tube joint clips are on the collar of the fuel tube joint.
- After installing the tube joint clip, check that the fuel tank main tube and return tube can be pulled out.
| 3. INSTALL FUEL TANK ASSEMBLY |
Set the fuel tank assembly onto the mission jack.
Connect the fuel tank vent hose.
Align the fuel tank vent connector with the pipe, then push in the fuel tank vent connector until the retainer makes a "click" sound to connect the fuel tank vent hose to the fuel suction plate.
- NOTICE:
- Check that there are no scratches or foreign objects around the connected part of the fuel tank vent connector and plug before performing this work.
- After connecting the fuel tank vent hose, check that the fuel tank vent hose is securely connected by pulling the quick connector.
Connect the fuel pump connector.
Install the fuel pump cover.
Connect the fuel tank to filler pipe hose.
Install the 2 fuel tank bands.
Install the 2 fuel tank bands with the 2 pins and 2 clips.
Install the 2 fuel tank bands with the 2 bolts.
- Torque:
- 62 N*m{ 632 kgf*cm , 46 ft.*lbf }
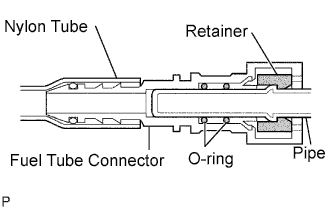
Connect the fuel tank breather tube.
Align the fuel tube connector with the pipe, then push the fuel tube connector in until the retainer makes a "click" sound to connect the fuel tank vent breather tube.
- NOTICE:
- Check that there are no scratches or foreign objects around the connected part of the fuel tube connector and pipe before performing this work.
- After connecting the fuel tank breather tube, check that the fuel pump tube is securely connected by pulling the fuel tube connector and pipe.
Install the checker onto the pipe.
 |
Tighten the clamp bolt.
| 4. CONNECT FUEL TANK MAIN TUBE AND FUEL TANK RETURN TUBE |
 |
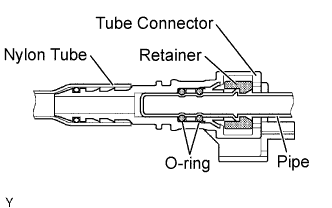
Connect the fuel tank main tube and return tube.
Align the fuel tube connector with the pipe, then push the fuel tube connector in until the retainer makes a "click" sound to connect the fuel tank main tube and return tube.
- NOTICE:
- Check that there are no scratches or foreign objects around the connected part of the fuel tube connector and pipe before performing this work.
- After connecting the fuel tube connector, check that the fuel tube connector and pipe are securely connected by pulling them.
Install the fuel pipe clamp.
| 5. INSTALL NO.1 FUEL TANK PROTECTOR SUB-ASSEMBLY |
Install the fuel tank protector LWR with the 4 nuts.
- Torque:
- 20 N*m{ 204 kgf*cm , 15 ft.*lbf }
| 6. ADD FUEL |
| 7. CONNECT CABLE TO NEGATIVE BATTERY TERMINAL |
- Torque:
- 5.4 N*m{ 55 kgf*cm , 48 in.*lbf }
| 8. CHECK FOR FUEL LEAK |