DIFFERENTIAL CARRIER OIL SEAL > INSTALLATION |

for Preparation Click here
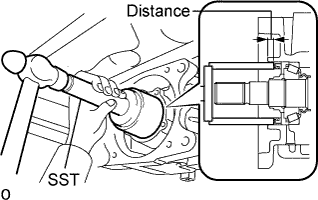
| 1. INSTALL DIAPHRAGM OIL SEAL |
Apply a light coat of MP grease No. 2 to the lip of a new diaphragm oil seal.
Using SST and a hammer, tap the diaphragm oil seal into the rear differential carrier according to the specification.
- SST
- 09710-30021
(09710-03121)
09950-60010 (09951-00570)
09950-70010 (09951-07100)
- Standard distance:
- 7.0 +/-0.5 mm (0.276 +/-0.0197 in.)
 |
| 2. INSTALL TRANSMISSION COUPLING SHIM |
Measure each of the dimensions.
- HINT:
- Dimension A: Bearing axis distance
- Dimension B: Drive pinion axis distance
 |
Select a transmission coupling shim based on the difference between dimensions A and B, and install the shim.
- Transmission Coupling Shim Type:
Difference of dimension A and B mm (in.) Thickness mm (in.) Identifying Mark 3.96 to 4.01 (0.148 to 0.154) 1.98 to 2.02 (0.078 to 0.080) 1 4.26 to 4.31 (0.161 to 0.168) 2.28 to 2.32 (0.090 to 0.091) 2 4.56 to 4.61 (0.174 to 0.181) 2.58 to 2.62 (0.102 to 0.103) 3 3.81 to 3.86 (0.141 to 0.148) 1.83 to 1.87 (0.072 to 0.074) 4 4.11 to 4.16 (0.154 to 0.161) 2.13 to 2.17 (0.084 to 0.085) 5 4.41 to 4.46 (0.168 to 0.174) 2.43 to 2.47 (0.096 to 0.097) 6 3.71 to 3.76 (0.146 to 0.148) 1.73 to 1.77 (0.068 to 0.070) 8 3.76 to 3.81 (0.148 to 0.150) 1.78 to 1.82 (0.070 to 0.072) 9 3.86 to 3.91 (0.151 to 0.154) 1.88 to 1.92 (0.074 to 0.076) 10 3.91 to 3.96 (0.154 to 0.156) 1.93 to 1.97 (0.076 to 0.078) 11 4.01 to 4.06 (0.158 to 0.160) 2.03 to 2.07 (0.080 to 0.081) 12 4.06 to 4.11 (0.160 to 0.162) 2.08 to 2.12 (0.082 to 0.083) 13 4.16 to 4.21 (0.164 to 0.166) 2.18 to 2.22 (0.086 to 0.087) 14 4.21 to 4.26 (0.166 to 0.168) 2.23 to 2.27 (0.088 to 0.089) 15 4.31 to 4.36 (0.170 to 0.172) 2.33 to 2.37 (0.092 to 0.093) 16 4.36 to 4.41 (0.172 to 0.174) 2.38 to 2.42 (0.094 to 0.095) 17 4.46 to 4.51 (0.176 to 0.178) 2.48 to 2.52 (0.098 to 0.099) 18 4.51 to 4.56 (0.178 to 0.180) 2.53 to 2.57 (0.100 to 0.101) 19 4.61 to 4.66 (0.181 to 0.183) 2.63 to 2.67 (0.104 to 0.105) 20 4.66 to 4.71 (0.183 to 0.185) 2.68 to 2.72 (0.106 to 0.107) 21
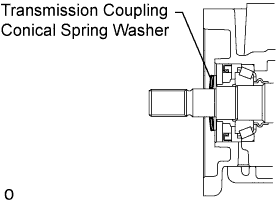
| 3. INSTALL TRANSMISSION COUPLING CONICAL SPRING WASHER |
Install the transmission coupling conical spring washer to the rear differential carrier.
- NOTICE:
- Install the transmission coupling conical spring washer so that the green marking (protruding part) is facing the front of the vehicle (coupling side).
 |
| 4. INSTALL YOKE |
Using a 5 mm socket hexagon wrench, install the yoke with the 3 bolts.
- Torque:
- 5.0 N*m{ 51 kgf*cm , 44 in.*lbf }
| 5. INSTALL 4WD LINEAR SOLENOID |
Install a new O-ring to the solenoid.
- NOTICE:
- Do not damage or twist the O-ring .
Install the solenoid to the yoke.
Install the snap ring.
| 6. INSTALL ELECTROMAGNETIC COUPLING |
Using white gasoline, remove grease and oil from the alignment surfaces of the rear differential carrier and transmission coupling.
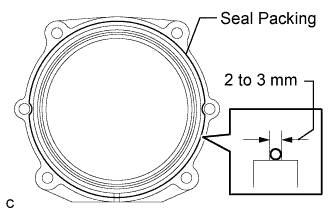
Apply seal packing to the areas indicated in the illustration of the transmission coupling.
- Seal packing:
- Toyota Genuine Seal Packing 1281, Three Bond 1281 or equivalent
- NOTICE:
- Apply seal packing in a continuous line 2 to 3 mm (0.0787 to 0.118 in.) in diameter.
- Perform the installation with 3 minutes of applying seal packing 1281.
 |
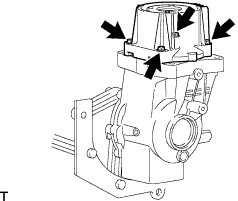
Install the rear differential carrier cover to the rear differential carrier assembly with the 4 bolts.
- Torque:
- 20 N*m{ 200 kgf*cm , 14 ft.*lbf }
 |
| 7. INSTALL PROPELLER WITH CENTER BEARING SHAFT ASSEMBLY |
Install the propeller shaft (Click here).
| 8. ADD DIFFERENTIAL OIL |
Stop the vehicle on a level surface.
Using a 10 mm socket hexagon wrench, remove the rear differential filler plug and gasket.
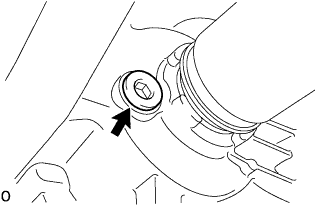 |
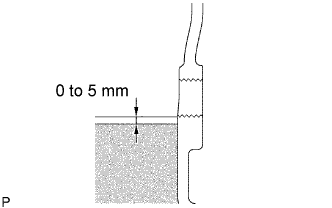
Check that the oil level is between 0 to 5 mm (0 to 0.197 in.) from the bottom lip of the differential filler plug hole.
- NOTICE:
- After changing the oil seal, drive the vehicle and then check the oil level again.
- Too much or too little oil will lead to differential problems.
- If there is not enough oil, inspect for oil leaks, and fill the differential carrier assembly with hypoid gear oil.
- Recommended viscosity:
- SAE 85W-90
- Standard oil grade:
- Hypoid gear oil SX API GL-5 or equivalent
- Standard differential oil capacity:
- 0.45 to 0.55 liters (0.48 to 0.58 US qts., 0.40 to 0.48 Imp. qts.)
 |
Using a 10 mm socket hexagon wrench, install a new gasket and the rear differential filler plug.
- Torque:
- 39 N*m{ 398 kgf*cm , 29 ft.*lbf }