FUEL LID LOCK CONTROL (for Extra Cab) > INSTALLATION |

for Preparation Click here
- HINT:
- Use the same procedure for RHD and LHD vehicles.
- The procedure listed below is for LHD vehicles.
| 1. INSTALL FUEL FILLER OPENING LID LOCK RETAINER |
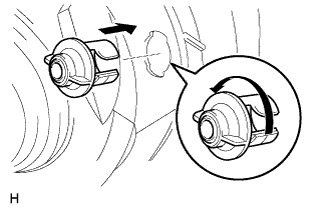 |
Install the fuel filler opening lid lock retainer and turn it counterclockwise as shown in the illustration.
| 2. INSTALL FUEL LID LOCK CONTROL CABLE SUB-ASSEMBLY |
for LHD:
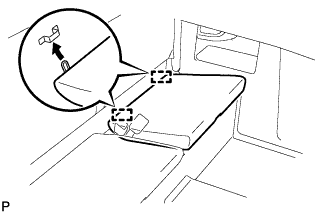
Install the fuel lid lock control cable and turn the fuel filler opening lid lock retainer clockwise as shown in the illustration.
Attach the cable to the clamps shown in the illustration.
Install the grommet to the vehicle body.
Install the fuel lid lock open lever.
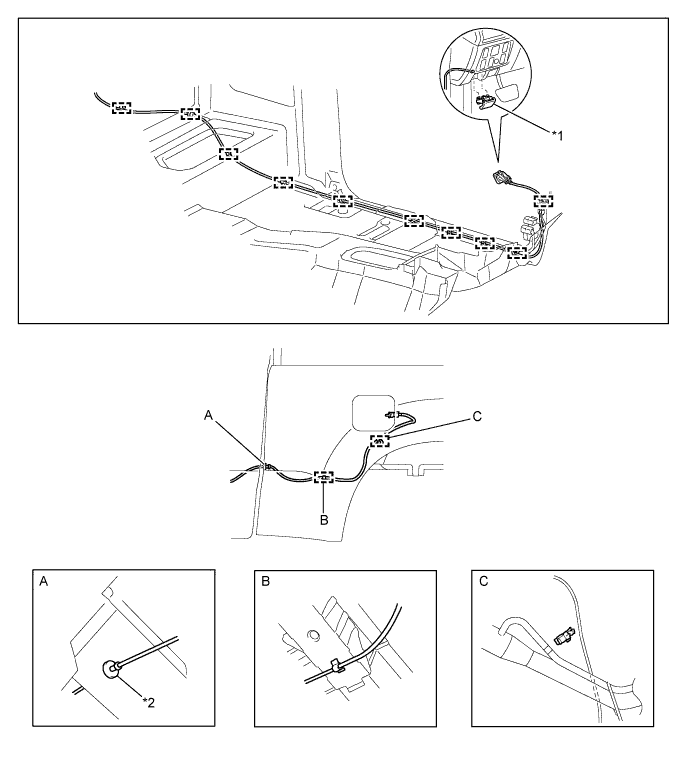
Text in Illustration *1 Fuel Lid Lock Open Lever *2 Grommet

for RHD:
Install the fuel lid lock control cable and turn the fuel filler opening lid lock retainer clockwise as shown in the illustration.
Attach the cable to the clamps shown in the illustration.
Install the grommet to the vehicle body.
Install the fuel lid lock open lever.
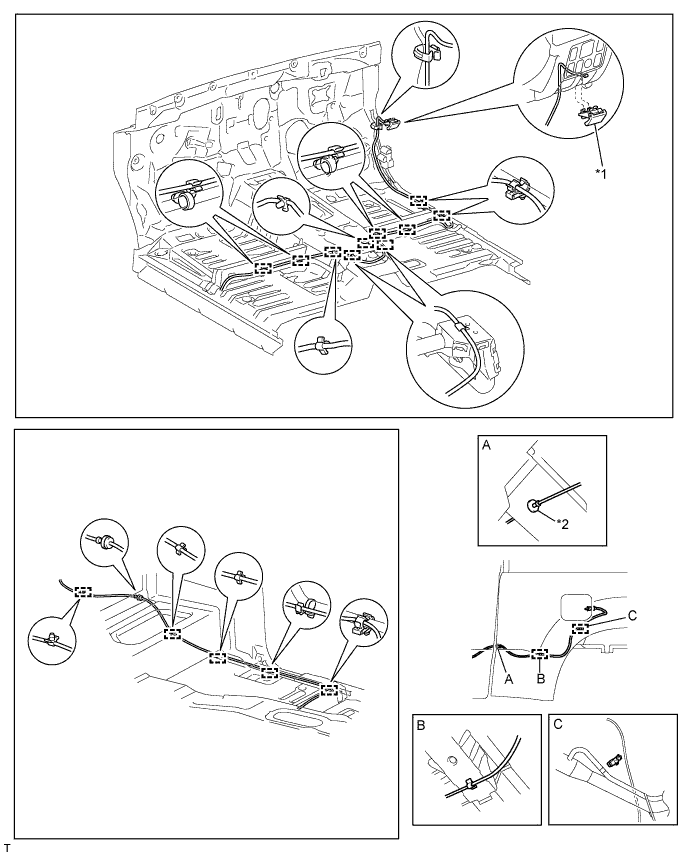
Text in Illustration *1 Fuel Lid Lock Open Lever *2 Grommet
| 3. INSTALL REAR WHEEL HOUSE LINER LH |
Install the rear wheel house liner.
| 4. INSTALL REAR NO. 1 WHEEL OPENING EXTENSION SUB-ASSEMBLY LH (w/ Over Fender) |
Install 11 new clips to the rear No. 1 wheel opening extension.
Attach the 11 clips to install the rear No. 1 wheel opening extension.
w/ Mudguard:
Install the 5 screws.
w/o Mudguard:
Install the 8 screws.
| 5. INSTALL FRONT FLOOR CARPET ASSEMBLY |
Install the front floor carpet.
| 6. INSTALL QUARTER INSIDE TRIM BOARD LH |
Attach the 7 clips, 3 guides and 4 claws to install the quarter inside trim board.
Install the front door opening trim.
Connect the front seat outer belt floor anchor with the bolt.
- Torque:
- 42 N*m{ 428 kgf*cm , 31 ft.*lbf }
| 7. INSTALL COWL SIDE TRIM BOARD LH (for LHD) |
Attach the 2 clips to install the cowl side trim board.
Install the clip.
Install the front door opening trim.
| 8. INSTALL COWL SIDE TRIM BOARD RH (for RHD) |
- HINT:
- Use the same procedure described for the LH side.
| 9. INSTALL FRONT DOOR SCUFF PLATE LH |
Attach the 4 clips and 8 claws to install the front door scuff plate.
| 10. INSTALL FRONT DOOR SCUFF PLATE RH (for RHD) |
- HINT:
- Use the same procedure described for the LH side.
| 11. INSTALL LOWER BACK PANEL GARNISH |
Attach the 5 clips, 2 guides and 6 claws to install the lower back panel garnish.
| 12. INSTALL REAR SEATBACK ASSEMBLY |
Place the rear seatback assembly in the cabin.
- NOTICE:
- Be careful not to damage the vehicle body.
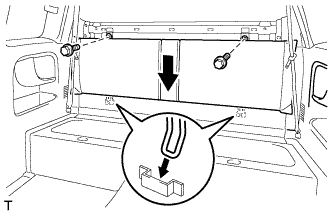 |
Attach the 2 hooks to the vehicle body.
Install the rear seatback assembly with the 2 bolts.
- Torque:
- 39 N*m{ 398 kgf*cm , 29 in.*lbf }
| 13. INSTALL UPPER BACK PANEL GARNISH |
Attach the 5 clips and 4 claws to install the upper back panel garnish.
| 14. INSTALL REAR SEAT CUSHION ASSEMBLY LH (w/ Seat Cushion) |
Attach the 2 hooks.
 |
Attach the hook to install the rear seat cushion assembly LH.
 |
| 15. INSTALL REAR SEAT CUSHION ASSEMBLY RH (w/ Seat Cushion) |
- HINT:
- Use the same procedures described for the LH side.
| 16. INSTALL CONSOLE BOX ASSEMBLY |
| 17. INSTALL FRONT SEAT ASSEMBLY LH |
w/ Front Seat Side Airbag:
(Click here)
for Separate Seat Type:
(Click here)
| 18. INSTALL FRONT SEAT ASSEMBLY RH |
- HINT:
- Use the same procedure described for the RH side.