AMPLIFIER ANTENNA (for TMMK Made) > REMOVAL |

for Preparation Click here
| 1. PRECAUTION |
- NOTICE:
- After turning the ignition switch off, waiting time may be required before disconnecting the cable from the negative (-) battery terminal. Therefore, make sure to read the disconnecting the cable from the negative (-) battery terminal notices before proceeding with work (Click here).
| 2. DISCONNECT CABLE FROM NEGATIVE BATTERY TERMINAL |
- CAUTION:
- Wait at least 90 seconds after disconnecting the cable from the negative (-) battery terminal to disable the SRS system.
- NOTICE:
- When disconnecting the cable, some systems need to be initialized after the cable is reconnected (Click here).
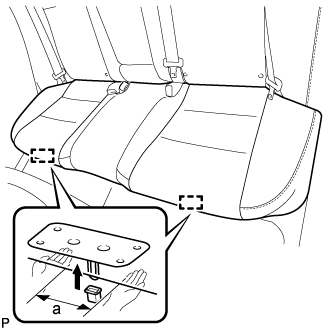
| 3. REMOVE REAR SEAT CUSHION ASSEMBLY |
Lift up the front edge of the rear seat cushion assembly as shown in the illustration and disengage the 2 rear seat cushion frame hooks on the front side of the rear seat cushion assembly from the 2 rear seat cushion lock hooks.
Standard Measurement a 100 mm (3.94 in.) or less - NOTICE:
- Be sure to hold the part of the rear seat cushion assembly directly next to the rear seat cushion lock hooks when lifting it up. Lifting a different part of the rear seat cushion assembly may deform the rear seat cushion frame.
 |
Pass the 2 rear seat inner belt assemblies through the rear seat cushion assembly and remove the rear seat cushion assembly.
- NOTICE:
- Be careful not to damage the vehicle body.
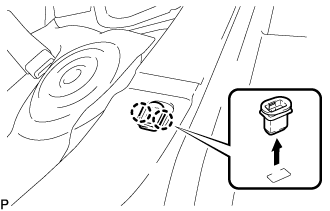
| 4. REMOVE REAR SEAT CUSHION LOCK HOOK |
Disengage the 2 claws to remove the rear seat cushion lock hook as shown in the illustration.
- NOTICE:
- Rear seat cushion lock hooks must not be reused.
- HINT:
- Use the same procedure for the RH side and the LH side.
 |
| 5. REMOVE REAR SIDE SEATBACK ASSEMBLY RH |
Disconnect the rear seat outer belt assembly from the rear seat shoulder belt guide.
Disconnect the connector.
Remove the 2 bolts.
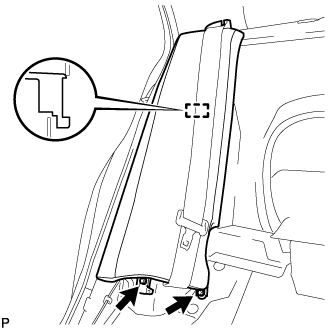 |
Disengage the hook and remove the rear side seatback assembly RH.
| 6. DISCONNECT REAR DOOR OPENING TRIM WEATHERSTRIP RH |
Disconnect the rear door opening trim weatherstrip RH.
| 7. REMOVE ROOF SIDE INNER GARNISH RH |
- HINT:
- Use the same procedure as for the LH side (Click here).
| 8. REMOVE AMPLIFIER ANTENNA ASSEMBLY |
Disconnect the 4 connectors and disengage the clamp.
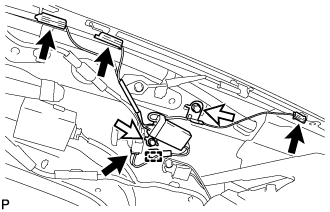 |
Remove the 2 bolts and the amplifier antenna assembly.